


Will My Dog Miss Me If I Leave Him For A Week: Exploring Canine Separation Anxiety
Will My Dog Miss Me If I Leave Him For A Week Leaving your furry friend behind can be a difficult experience, filled with questions and concerns. One …
Read Article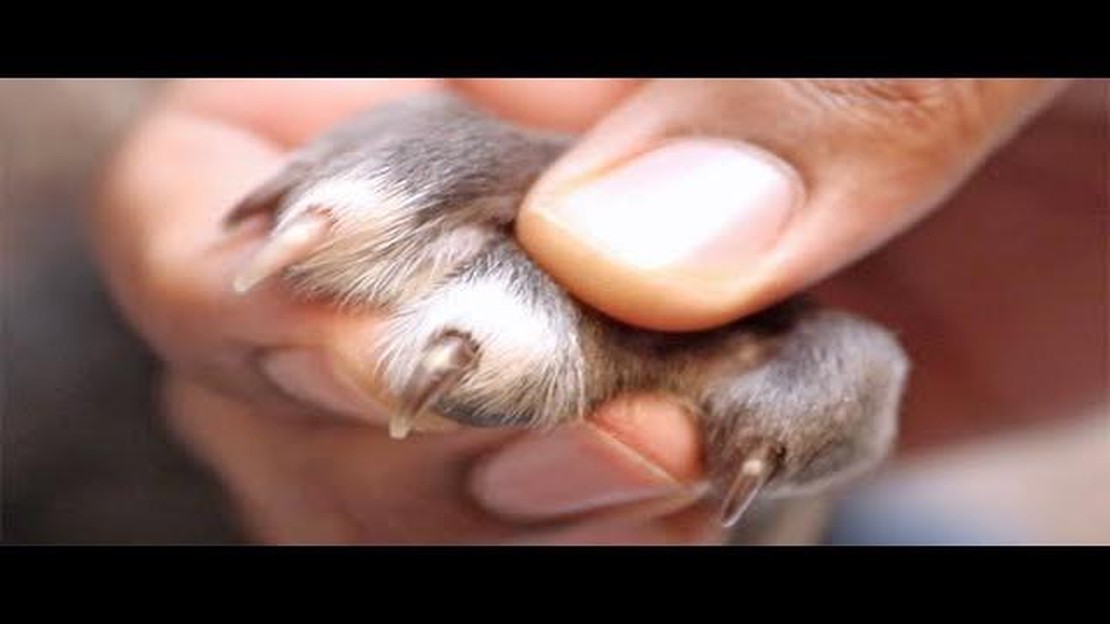
If you have a new puppy, one of the important things you need to learn is how to trim their nails. Keeping your puppy’s nails trimmed not only helps prevent them from getting too long and causing discomfort, but it also reduces the risk of damage to your furniture and floors. However, trimming a puppy’s nails can be a bit daunting, especially if you’ve never done it before.
In this step-by-step guide, we will walk you through the process of safely cutting your 8-week-old puppy’s nails. It’s important to note that the techniques described here are specifically for puppies of this age. Older puppies may require a different approach. Before you begin, it’s important to have the right tools, a calm environment, and a positive mindset.
First, gather all the necessary supplies. You will need a pair of puppy nail clippers, which are designed specifically for small dogs and puppies. Regular human nail clippers can be too large and can cause injury. Additionally, have some styptic powder or a styptic pencil on hand in case you accidentally cut the nail too short and cause bleeding. It’s also a good idea to have some treats nearby to reward your puppy and make the experience more pleasant.
Next, find a quiet and comfortable area where you can safely trim your puppy’s nails. Ideally, choose a well-lit space with good ventilation. You may want to lay a towel or a non-slip mat on the floor to prevent your puppy from sliding around. It’s important to create a calm and relaxed environment to minimize stress for both you and your puppy.
Now that you have everything set up, it’s time to start trimming your puppy’s nails. Gently hold your puppy’s paw in one hand and gently press their pad to extend the nail. Take a deep breath and carefully position the clipper around the tip of the nail. Remember, you want to trim just the pointed tip and avoid cutting into the quick, which is the sensitive part of the nail that contains blood vessels and nerves.
If you’re unsure where the quick is, look for the translucent part of the nail. It’s easier to see on lighter-colored nails. Trim a small piece at a time and stop before reaching the quick. If your puppy has dark nails and you can’t see the quick, it’s recommended to trim a little bit at a time or seek guidance from a professional groomer or veterinarian. Once you’ve trimmed one nail, give your puppy a treat and praise. Repeat the process for the rest of the nails, taking breaks if needed.
After you finish trimming your puppy’s nails, take a moment to double-check for any sharp edges or jagged bits. Use a nail file or a fine-grit emery board to smooth out any rough edges. If you accidentally cut a nail too short and it starts bleeding, apply a small amount of styptic powder or use a styptic pencil to help stop the bleeding. If bleeding persists or you have any concerns, contact your vet for further advice.
Remember, nail trims should be a regular part of your puppy’s grooming routine. By following these steps and practicing patience and care, you can safely trim your 8-week-old puppy’s nails and help keep them happy and healthy.
Keeping your puppy’s nails trimmed is an essential part of their overall health and well-being. Although it may seem like a small and insignificant task, neglecting to cut your puppy’s nails can lead to various problems and discomfort for your furry friend.
Here are several reasons why it’s important to cut your 8-week-old puppy’s nails:
It’s important to note that cutting your puppy’s nails requires care and caution to avoid hurting them. If you’re unsure or uncomfortable with this task, it’s best to seek guidance from a professional groomer or your veterinarian. They can show you the proper technique and provide advice tailored to your puppy’s specific needs.
Regular nail trimming is an essential part of your puppy’s grooming routine that can have numerous benefits for their overall health and well-being. Here are some key advantages of keeping your puppy’s nails trimmed:
It’s important to note that while regular nail trimming is beneficial, it’s essential to use proper techniques and tools to prevent causing any injuries to your puppy. It’s recommended to consult a professional groomer or a veterinarian for guidance on how to trim your puppy’s nails safely and effectively.
By making nail trimming a regular part of your puppy’s grooming routine, you can ensure their nails stay at a healthy length, promoting their overall comfort, mobility, and well-being.
Trimming your 8-week-old puppy’s nails can be a bit nerve-wracking, but with the right approach and preparation, you can make the process much safer and less stressful for both you and your furry friend. Here are some steps you can take to prepare for a safe nail trimming session:
By following these preparations, you can ensure a safe and stress-free nail trimming session for your 8-week-old puppy. Remember to take it slow, be patient, and always prioritize your puppy’s comfort and well-being.
Before you begin the process of cutting your 8-week-old puppy’s nails, it’s important to gather all the necessary tools and supplies. This will ensure that you have everything you need and can complete the task safely and efficiently.
Here is a list of the essential tools and supplies you will need:
Read Also: Is Thyme Oil Safe For Dogs: Everything You Need To Know
It’s important to use nail clippers or scissors that are specifically designed for puppies. These tools have smaller blades and a gentler design, making it safer and easier to trim your puppy’s nails without causing any harm.
A nail file or emery board will be useful to smooth any rough edges after trimming your puppy’s nails. This will help prevent any accidental scratching or snagging that could occur with sharp edges.
Read Also: Selsun Blue for Dogs: How to Use and Benefits
Treats or rewards are essential for positive reinforcement during the nail-cutting process. By offering treats and praise, you can help associate the experience with something positive and make it a more enjoyable and stress-free activity for your puppy.
Using a towel or blanket can provide comfort and stability for your puppy during the nail trimming process. This will also help prevent them from squirming or trying to escape, making the task easier to perform.
Lastly, it can be helpful to have styptic powder or cornstarch on hand in case of accidental bleeding. If you accidentally cut your puppy’s nail too short and it starts to bleed, applying a small amount of styptic powder or cornstarch can help stop the bleeding.
By gathering all these necessary tools and supplies before you begin, you can ensure that you have everything you need to safely and effectively cut your 8-week-old puppy’s nails.
Cutting your puppy’s nails is an important part of their grooming routine and essential for their overall health. However, it can be a daunting task if you are unsure how to do it safely. Follow these steps to ensure a stress-free and safe nail trimming session for your furry friend:
Remember, it’s important to remain calm and patient throughout the process. If you feel unsure or uncomfortable with trimming your puppy’s nails, don’t hesitate to seek professional help from a veterinarian or a professional groomer.
One of the most important steps in cutting your 8-week-old puppy’s nails is getting them used to having their paws handled. This will help them feel more comfortable and cooperative during the actual nail trimming process. Here are some tips to help you get started:
By following these steps and gradually introducing your puppy to having their paws handled, you can create a positive foundation for successful nail trimming sessions in the future.
When it comes to trimming your 8-week-old puppy’s nails, it’s important to choose the right technique to ensure their safety and comfort. Here are a few techniques to consider:
When choosing the right technique, consider the size and thickness of your puppy’s nails, as well as their comfort level. If your puppy is nervous about having their nails trimmed, it may be best to start with a grinder or scissor-style clippers, as they allow for more control and precision. It’s important to introduce the clippers or grinder gradually and positively reinforce your puppy during the process.
Note: Before trimming your puppy’s nails, it’s important to have a styptic powder or cornstarch on hand to stop any bleeding that may occur if the quick is accidentally cut. Additionally, it’s recommended to have someone assist you during the process, as they can help hold and comfort your puppy while you trim their nails.
You will need a pair of dog nail clippers or a Dremel tool, styptic powder in case you accidentally cut the quick, and treats to reward your puppy for good behavior.
It is recommended to trim your puppy’s nails every 2-3 weeks to ensure they do not become too long and cause discomfort or injury.
Having someone help you hold your puppy can make the process easier and safer, especially if your puppy gets restless or tries to pull away.
It is important to take a calm and patient approach when cutting your puppy’s nails. Start by getting your puppy used to having their paws touched and gradually introduce the clippers or Dremel tool. Make sure to reward your puppy for good behavior throughout the process.
If you accidentally cut the quick and your puppy starts bleeding, apply styptic powder to the nail to stop the bleeding. If the bleeding does not stop or your puppy seems in pain, consult a veterinarian for further guidance.
Will My Dog Miss Me If I Leave Him For A Week Leaving your furry friend behind can be a difficult experience, filled with questions and concerns. One …
Read Article
Girl Dog In Secret Life Of Pets The Secret Life of Pets is a heartwarming animated film that takes you on a journey into the secret lives of our …
Read Article
Loose Dogs In My Neighborhood Living in a neighborhood with loose dogs can be a frustrating and sometimes dangerous experience. Whether you’re a dog …
Read Article
Dogs That Hunt Moles Introducing our incredible lineup of dogs that are experts in mole hunting. These four-legged heroes have been bred and trained …
Read Article
A Dog’s Journey Sequel Get ready for another heartwarming adventure as the beloved canine characters from “A Dog’s Purpose” return in the highly …
Read Article
Can Dogs Have Learning Disabilities Dogs have long been regarded as intelligent and trainable animals, capable of learning a wide range of commands …
Read Article


