


How Long Do Dogs Tie For: Understanding Dog Reproduction
How Long Do Dogs Tie For Dog reproduction is a fascinating and complex process that is important not only for breeders, but also for dog owners and …
Read Article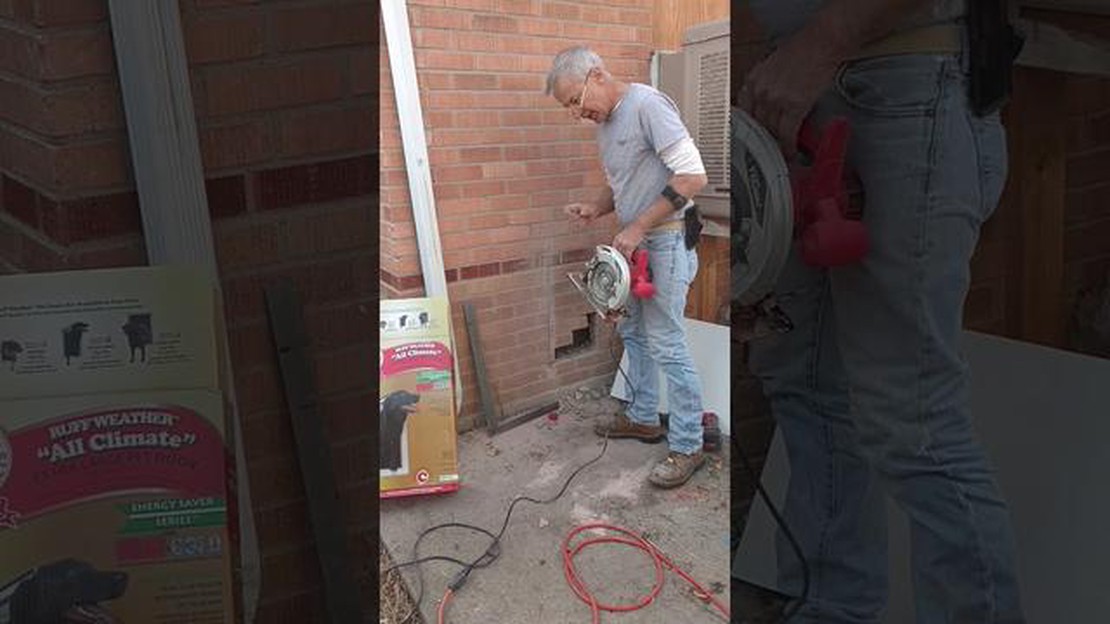
Are you tired of being your dog’s personal doorman? Installing a dog door through a brick wall can give your furry friend the freedom to come and go as they please, while also giving you a much-needed break.
But how do you go about installing a dog door through a brick wall? Don’t worry, we’ve got you covered. In this step-by-step guide, we’ll walk you through the process of installing a dog door yourself, saving you time and money.
Step 1: Measure and Choose the Right Location
The first step in installing a dog door through a brick wall is to measure your dog. Measure from the floor to the top of your dog’s shoulders to determine the correct height for the dog door. Then, choose the location on the wall where you want to install the dog door. Make sure it’s easily accessible for your dog and convenient for you.
Step 2: Gather the Necessary Tools and Materials
Before you start the installation process, gather all the necessary tools and materials. You’ll need a drill with a masonry bit, a jigsaw, a level, a tape measure, a pencil, a putty knife, a caulk gun, silicone caulk, and of course, the dog door kit.
Step 3: Mark and Cut the Opening
Using a pencil and a level, mark the outline of the dog door on the wall. Make sure it’s centered and level. Then, using a drill with a masonry bit, drill holes along the inside edge of the outline. This will serve as a guide for the jigsaw. Use the jigsaw to carefully cut along the outline, following the drilled holes. Take your time and be precise.
Step 4: Insert and Secure the Dog Door
Once you’ve cut the opening, it’s time to insert and secure the dog door. Apply a bead of silicone caulk along the edges of the opening and insert the dog door into the opening. Use the provided screws to secure the dog door in place. Make sure it’s level and secure.
Step 5: Test and Seal the Dog Door
After the dog door is secure, test it to make sure it’s working properly. Open and close the door to ensure smooth operation. Then, use silicone caulk to seal any gaps between the dog door and the wall. This will prevent drafts and water leaks.
Step 6: Let Your Dog Enjoy Their New Freedom
Now that you’ve successfully installed a dog door through a brick wall, it’s time to let your dog enjoy their new freedom. Watch as they confidently go in and out, and appreciate the convenience it brings to both you and your furry friend.
Installing a dog door through a brick wall may seem daunting, but with this step-by-step guide, it’s a breeze. Give yourself and your dog the gift of convenience and freedom with a dog door. Follow these easy steps, and you’ll be a DIY dog door installation pro in no time.
Before you begin the installation process for a dog door through a brick wall, it is important to plan and prepare properly. This will help ensure a smooth and successful installation.
Once you have completed the planning and preparation phase, you will be ready to move on to the next steps of the installation process.
When it comes to installing a dog door through a brick wall, one of the most important steps is to measure your dog and choose the right door size. Here’s a step-by-step guide to help you through the process:
Read Also: Understanding Aspiration Pneumonia: Coping With the Loss of My Beloved Dog
By taking the time to measure your dog and choose the right door, you can ensure a successful installation that provides your furry friend with the freedom and convenience they deserve.
Before beginning the installation process, it’s important to gather all the necessary tools and materials. Here is a list of what you will need:
It’s important to have all the necessary tools and materials before starting the installation process. This will help ensure a smooth and efficient installation process and prevent any delays or interruptions.
Before installing a dog door through a brick wall, it is important to properly prepare the wall to ensure a secure and effective installation. Follow these steps to prepare the wall:
By preparing the wall thoroughly, you can ensure a smooth installation process and maximize the functionality of the dog door in your brick wall.
Before you start installing a dog door through a brick wall, it is important to properly locate and mark the cut area. Follow these steps to ensure a precise and accurate placement:
Read Also: Kirkland Dog Food Feeding Guide: Expert Tips and Recommendations
Once you have located and marked the cut area, you can proceed with the next steps of the dog door installation process.
Once you have measured and marked the desired location for the dog door on the brick wall, it’s time to start cutting the hole.
Materials needed:
Step 1: Put on safety goggles and gloves to protect yourself from any flying debris. The cutting process can create a lot of dust and debris, so it’s important to take safety precautions.
Step 2: Use a masonry drill to create pilot holes in each corner of the marked area. This will help guide the chisel and make the cutting process easier.
Step 3: Start chiseling along the marked line, using the pilot holes as a guide. Be sure to tap the chisel firmly with the hammer to create a groove in the brick.
Step 4: Continue chiseling along the entire marked line, gradually deepening the groove until you have cut through the brick wall.
Step 5: Once you have cut through the brick wall, remove any excess debris and clean up the area.
Note: Be cautious when chiseling through the brick wall as it can be a labor-intensive process. It’s important to take breaks and work at a comfortable pace to avoid injury.
Conclusion: Cutting the hole in the brick wall is a crucial step in installing a dog door. With the right tools and safety precautions, you can create a space for your furry friend to easily access the outdoors.
To install a dog door through a brick wall, you will need a drill with a masonry bit, a reciprocating saw, a level, a measuring tape, a pencil, a jigsaw, a caulk gun, silicone caulk, a pry bar, a hammer, a chisel, safety goggles, and a dust mask.
Yes, before installing a dog door through a brick wall, you will need to measure the height and width of your dog, as well as the thickness of the wall. It’s also important to consider the height at which the door will be installed to ensure your dog can comfortably enter and exit.
While it is possible to install a dog door through a brick wall by yourself, it can be a challenging and time-consuming task. If you are not comfortable with DIY projects or have limited experience with home renovations, it may be best to hire a professional to ensure the installation is done correctly and safely.
Installing a dog door through a brick wall allows your dog to have easy access to the outdoors, which can be beneficial for their physical and mental well-being. It also gives you the convenience of not having to constantly let your dog in and out, especially if you have a busy schedule or are away from home for extended periods of time.
Yes, it is necessary to seal the dog door after installation to prevent drafts, water leaks, and pests from entering your home. You can use silicone caulk to seal around the edges of the dog door and the hole in the wall to ensure a tight and secure fit.
The time it takes to install a dog door through a brick wall can vary depending on your experience level, the tools you have available, and the complexity of the installation. On average, it can take anywhere from a few hours to a full day to complete the installation.
How Long Do Dogs Tie For Dog reproduction is a fascinating and complex process that is important not only for breeders, but also for dog owners and …
Read Article
Can Dogs Eat Hard Boiled Egg Yolk When it comes to feeding our furry friends, it’s important to know which foods are safe and which are not. One food …
Read Article
Dead Puppy Dream Meaning Dreams have long been a source of fascination and intrigue for humans. They can be filled with vivid imagery and intense …
Read Article
Police Dog Teeth Implants The Ultimate Guide Do you want to enhance your police dog’s performance in the field? Table Of Contents Why Police Dogs Need …
Read Article
Wookie Dog Commercial Introducing the Wookie Dog Commercial “Unbelievably hilarious and adorable, the Wookie Dog Commercial will have you rolling on …
Read Article
Do Vets Recommend Milk Bones When it comes to pet health, there are always questions about which treats are best for our furry friends. One common …
Read Article


